|
Picking
A Needlework Frame
Since I included a note about
the availability of slate frames
in previous newsletters, I've had
a number of people ask me about
why they'd want or need one. So I
thought I'd explain a bit about
the various "stitching frame"
types on the market and update
some information that I wrote
about a couple of years ago. Keep
in mind these are my opinions only
- ask another shop owner or
stitcher and they might disagree.
In the end what you use to help
you stitch is in large part,
personal preference. If you want
to see what we carry in the shop
click on the section titles below.
I personally stitch in-hand for
about 80% of my projects and
that's true whether it's a large
needlepoint canvas or a small
over-one cross-stitch on 40 count
linen. I like being able to roll
or scrunch my fabric and in many
cases, I stitch using a sewing
motion. Rather than stick 'n stab
(stick the needle in, stab it back
up), sewing motion is more like
hand-sewing (which I've done
longer than I've stitched). I make
the in-out motion in one pass. To
do that I need my canvas or fabric
to be flexible so I can bend it
and get the needle to make a
single pass. However, there are
many times when I do use a frame
of some kind. If I'm working a
piece where I have to lay the
threads (e.g. a needlepoint piece
stitching with Neon Rays) and I'm
using a laying tool, or I'm
working with slippery threads
(Soie Gobelins) I'll put it in a
frame of some kind. I use all of
them, stretcher bars (regular,
mini & Evertite), hoops,
Q-Snaps, scroll frames and a slate
frame (I own 6 in various sizes).
A frame allows my work to be
stable and allows me to use two
hands when I need to.
The
various types of frames on the
market are:
|
Scroll Frame
(vertical)
Belt Frame
(horizontal)
|
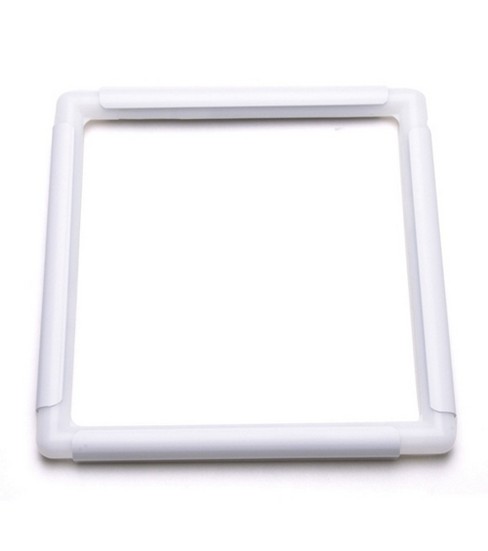
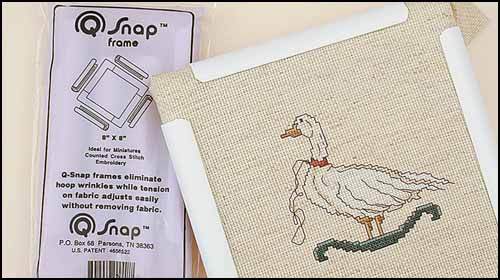
Q-Snaps
|
|
Wood Hoops
(Square, Round or Oval)
Plastic Hoops
|
Slate Frame
|
|
Stretcher Bars
|
I suspect that most of us have
used an embroidery hoop at one
time or other, whether for hand
work or machine work (I also do
machine embroidery in my personal
life). The kind of wood &
plastic hoops I grew up with have
matured into wonderfully smooth Hardwicke
Manor hoops, Susan
Bates Hoop-La
Hoops and Q-Snaps.
You can still find the inexpensive
wood and plastic hoops in craft
stores, but if you're going to
work on nice fabric, use nice
tools. Your fabric will thank you
for it.
I use a hoop when I want the
fabric to be pretty taut and it's
not big or if I'm working on silk
gauze. You can use a smaller hoop
and move it around a bigger piece
of fabric but you can end up with
creases where you don't want them.
If you stitch on Aida I don't
recommend a hoop but do recommend
a Q-Snap. If you look at the edges
of a hoop you'll see that the
radius of the wood is very small.
A small radius means sharper
folds, which translates into
sharper creases. Most Aida is made
from cotton, which holds a crease
really, really well. I'm sure you
either experienced or have seen a
stitched Aida piece with hoop
marks. Getting them out is a pain
(to be polite), if you can even
manage it. So to avoid that
problem, don't use a hoop with
Aida, use a Q-Snap. The PVC pipe
Q-Snaps are made out of has a
larger radius so a gentler curve
to the edge. This means minimal
Q-Snap "marks" if any at all.
Also, needlepoint canvas is too
thick to be mounted into hoops and
Q-Snaps. You might be able to get
Congress cloth into a Q-Snap but
frankly, it's too much of a pain
so I use stretcher bars, a scroll
frame or slate frame for canvas.
  Why
do I lump Q-Snaps in with the
hoops? In practice they are closer
to a hoop than to stretcher bars
in my personal opinion. Once you
connected the PVC pieces that form
the "frame" you lay your fabric on
it and then snap the holders into
place. You can use a smaller
Q-Snap than the design area of
your project and move it around,
but if you are going to be placing
the snap holders over stitched
work, lay a strip of muslin or
cotton over the threads. The
underside of the snap holders are
ridged so you don't want to run
the risk of having them catch on
your stitching, 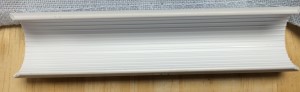 especially
when you slide the snap holders
off. I don't recommend that use
Q-Snap or hoops if you are adding
beads and need to move the frame
around. There's too good a chance
of smashing the beads. If you
prefer to work in a hoop or Q-Snap
for stitching, take the project
off the frame and put the beads on
at the very end.
Mounting silk gauze into a hoop
requires sewing it to a larger
piece of plain fabric (e.g. muslin
or left over quilt fabric) and
then cutting a window in the
underside. Mary
Corbett has a great article
with photos on how to do that with
a hoop or even stretcher bars.
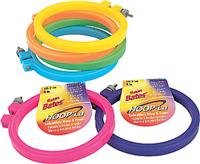
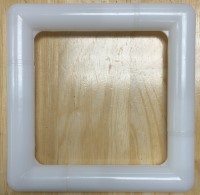
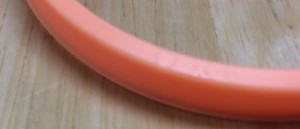
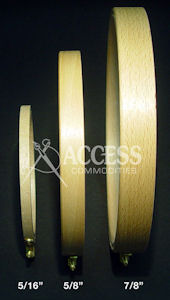 Hoops
are generally made either round or
oval but Hardwicke Manor also
makes a hoop called a square round
(see the photo above). You can't
really make a square hoop so this
is what happens when you bend the
wood to make a square shape. The
corners are rounded. They are
significantly more expensive due
to the method of manufacturing but
they do give you more surface area
than a round hoop does. Hardwicke
Manor hoops also come in different
heights or thicknesses, which
makes it easy to find the right
fit for your hands. Smaller hoops
come in 5/16", some in all 3
heights and larger hoops only in
7/8". The square round and oval
hoops only come in 5/16".
 Susan
Bates Hoop-La plastic hoops have a
lip that helps hold the fabric
tight. Also, plastic has give to
it which means you can pull the
fabric more and even if it
distorts the shape of the hoop
it's not a problem. I use one when
I'm doing punch needle as that
fabric has a stretchy component to
it. With a Susan Bates Hoop-La
hoop I can get punch needle fabric
drum tight. Non stretchy fabrics,
not quite so tight but still
pretty tight. Again, it's not what
I would use with Aida as you'll
end up with the crease problem.
Whether you wrap your wood hoop
or not is one of those almost
religious discussions. For me I
base on two simple factors. First,
is my hoop smooth and second, is
my fabric slippery. If both are
true, definitely wrap it with
twill tape (see Mary
Corbett's blog for a how
to). If my fabric is slippery I'm
still likely to wrap my hoop. But
if my hoop is smooth and my fabric
isn't (e.g. linen, Lugana, Linen
Twill, etc.) then I don't use a
wrapped hoop. You'll need to
experiment to see what works best
for you, or have a conversation
with your teacher if you're doing
a class project.
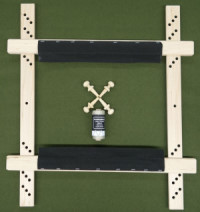
 Scroll
Frames Scroll
Frames work by allowing
you to scroll the fabric as you
work. Typical scroll frames scroll
vertically, so you have rods that
are at the top and bottom which
are as wide as the fabric and then
the side bars dictate how much of
the project is visible. For a
project that's 18x27 it would need
18" rods but your side bars might
be 8", 10" or 12" (or more)
depending on what you want
visible. You can get scroll frames
to hold the work stable, but not
tight. If you think about it, as
you work your stitching and roll
it up, there's going to be
stitching that affects the density
of the fabric. Even if the fabric
is completely empty you can never
get a scroll frame as tight as any
other method. You can get it a bit
tighter by either lacing the sides
or using elastic with clips, but
you have to move the lacing or
elastic as you scroll the project.
But generally you'll have a looser
project than on stretcher bars or
a slate frame.
If your project has beads or
raised stitches you might still be
able to use a scroll frame, but
you want to lay strips of batting
between the layers as you roll.
This helps prevent crushing the
beads or the raised stitches. One
of my staff wraps her scroll
frames with batting first so even
with just stitches, she can get it
to compress more but not crush the
stitches. Get a thickness of
batting that works best for your
particular project (quilt, fabric
and some craft stores carry a
variety of thicknesses). Cut it
into strips as wide as the fabric
and about 4" to 6", then layer it
as you roll up your work.
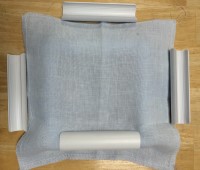
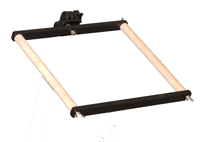 Have a
project that is wider than it is
tall - don't fret, you can use a
Belt Frame. While it has a
different name and sounds like a
single use tool, it's really a
scroll frame that scrolls
horizontally. So whether it's a
belt or a banner, you can scroll
the appropriate direction. If you
look at the photo of the horse
above, you'll see it's mounted on
a regular vertical scroll frame,
but the piece is really wider than
it is tall. At the time we put it
on the scroll frame as a sample at
the shop, we didn't have any belt
frames. But it would be easier to
stitch it on a horizontal
scrolling belt frame. K's Creation
makes a belt frame as does
Needlework System 4.
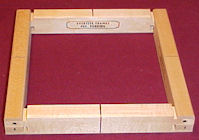
 Stretcher
Bars Stretcher
Bars - You can mount any
kind of fabric onto stretcher
bars, but typically they are used
for needlepoint canvas or heavier
fabric. Attach the fabric/canvas
with tacks or staples directly to
the wood. Whether you tack with
the work on top of the bars or on
the underside is again, a somewhat
religious discussion :-). I like
to attach mine on the underside of
the bars, facing up so that if I
drop the work on the floor the
right side of the stitching never
touches the floor. Plus as I work
closer to the edge my needle
doesn't get hung up in the bars.
There are 3 kinds on the market
but all use the same mortise &
tenon joint at the corners. Mini
bars, which are 1/2" thick are
made from 4" to 18" so are used on
smaller or lighter weight
projects. Regular bars are 3/4"
thick and are made from 4" up to
36" or more. These are used for
heavier, larger projects or if you
want more surface area to hold
onto (or mount into a table, floor
or lap frame). And Evertites,
which we can get custom made
larger than 40".
 The
reasons you might want to consider
Evertite bars are two-fold. 1)
they have a screw & bolt in
the mortise & tenon joint that
allows you to spread the bars
apart. So once your work starts to
stretch, you adjust the bars to
make the fabric/canvas tighter. 2)
they are physically wider bars (1"
to 1 1/4") so will take the stress
of cranking on those bolts to
stretch your project.
Regular bars (3/4") from any
vendor should go together, mini
bars (1/2") from any vendor should
go together and Evertites will
work with any size of Evertite.
But you can't mix types together -
so you can't have a Frankenbar
made up of an Evertite pair and a
regular pair. Stretcher bars as
always sold in pairs so to make up
a frame you need 2 pair.
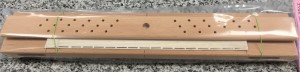
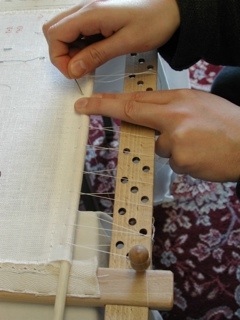 Slate
Frames Slate
Frames - If you want your
fabric or canvas drum tight - and
I do mean tight enough to bounce a
quarter from across the room, then
a slate frame is the best option.
With slate frames you attach the
fabric/canvas to the top and
bottom rods and then lace it to
the sides (using the pegs to
adjust the height). The trick with
slate frames is that you have to
tighten the lacing thread making
at least 3 times to get it tight
enough. I learned that lesson
years ago from Leon Conrad when I
took a Blackwork class from him.
If you're working on project for
along time you will likely have to
tighten the lacing thread multiple
times during your work, but it's
easy enough to do.  I've
seen many different ways of
dressing a slate frame so you
might want to do some research and
see what works best for you (see
my note below for Mary Corbett).
Unlike a scroll frame, a slate
frame needs to be at least as big
as the fabric you are mounting. So
if you're working on a project
that's 18" wide by 27" tall,
that's a big slate frame, but
you'll have very taut fabric and
it will be easier to use both
hands. Mounting a slate frame into
a stand is a bit of a problem
since most US stands are made for
thicker things like stretcher bars
and the pegs or cotter pins can
get in the way. Traditionally a
slate frame is mounted on a
trestle stand, which supports it
from underneath, not from the top
or side like most common US
stands. I use mine by balancing it
on my legs or if I need both
hands, sitting at a table and
balancing it on the edge of the
table. Someday I plan to purchase
a trestle for mine, once I figure
out where it will go in my house.
So
What Do I Choose?
Here's the considerations you
need to look at:
- I need it drum tight -
consider a slate frame or a hoop
if it's small, or Evertite bars
for canvas
- I have a big project and don't
want a big frame - consider a
scroll frame
- I have a tiny project and
don't want to stitch in-hand -
consider a hoop or Q-Snap if
it's fabric, small stretcher
bars if it's canvas
- I stitch on Aida and need a
frame - consider a Q-Snap or a
scroll frame
- I have a really wide project -
consider a belt frame
- I want to mount my project in
a floor, table or lap stand -
most stands hold stretcher bars
well but others can be an issue.
NS4 makes both a scroll frame
holder and a Q-Snap holder that
work very well. K's Creation and
Lowery stands will hold hoops,
Q-Snaps and scroll frames with a
bit of help (use cork to line
the underside of the clamps so
they don't slip as much).
Because the later 3 have rounded
edges vs. the square edges of
stretcher bars, they tend to
slip a bit more often - hence
the cork.
If you're still not sure what
to pick feel to ask us or your LNS
for help. Those with dexterity
concerns as well as visual and
reach concerns might need a
different option than what we'd
normally suggest.
Thanks for reading the
newsletter and I hope it imparts a
bit of useful information.
Happy Stitching,
Cathe (January 2016)
|